


Content
- 1 Is Your Deck Strong Enough for a Roof?
- 2 3 Popular Deck Roof Styles Compared
- 3 Step‑by‑Step: How to Plan Your Deck Roof Project
- 4 Deck Roof Cost Breakdown: What to Expect
- 5 DIY vs. Hiring a Pro: A Decision Framework
- 6 Permits & Codes: What You Need to Know
- 7 Pro Tips for a Successful Deck Roof Installation
Is Your Deck Strong Enough for a Roof?
You're standing on your deck in mid-July, squinting against the sun, wishing for shade. Or maybe you're watching rain pelt the boards, canceling the barbecue. Adding a roof solves that—yet your existing deck may not be ready for the extra weight. Before you draw a single plan, start with the load path: the roof weight must travel down through posts and footings originally intended for a deck alone.
A typical deck is designed for 40–50 pounds per square foot (psf) of live load, plus the dead load of the decking and joists. Add a roof, and the concentrated loads at posts can triple. In snow country, a 40 psf ground snow load can translate to 3,000–5,000 lb bearing on each footing—well beyond what a standard 12‑inch‑diameter footer can handle. The most frequent cause of failed deck roof projects isn't bad carpentry; it's undersized footings that sink or crack after the first winter.
Get a structural engineer involved before you buy materials. They'll check three things: post size and connection continuity, footing diameter and depth, and lateral bracing against wind uplift. If the existing deck was built without engineer‑stamped plans, assume the footings are inadequate. Dig down beside one to measure depth. If it's less than frost depth for your region or smaller than 18 inches in diameter, plan on replacing or supplementing it. Many engineers will spec a 24‑inch‑diameter footing at 12 inches thick for moderate snow loads.
Also, the roof posts must run continuously from footing to roof beam. Stacking new posts on top of deck beams creates a hinge point that won't pass inspection in most jurisdictions. That means you'll likely need to cut through the deck surface to set new posts, or bolt additional posts to the sides of existing ones with full structural connections. It's a weekend‑stopper, but the alternative is a roof that won't hold up during a nor'easter.
- Strip away a deck board beside a footing and measure its diameter and depth.
- Check that posts are continuous—or can be made continuous—from footing to roof level.
- Calculate the tributary roof area each post supports; a 10‑ft‑wide section of roof with a 12‑ft span can deliver over 2,000 lb per post.
- Confirm lateral tie‑ins to the house rim joist are rated for wind uplift; simple lag bolts may not be enough.
- Ask your building official for the local ground snow load number before calling an engineer.
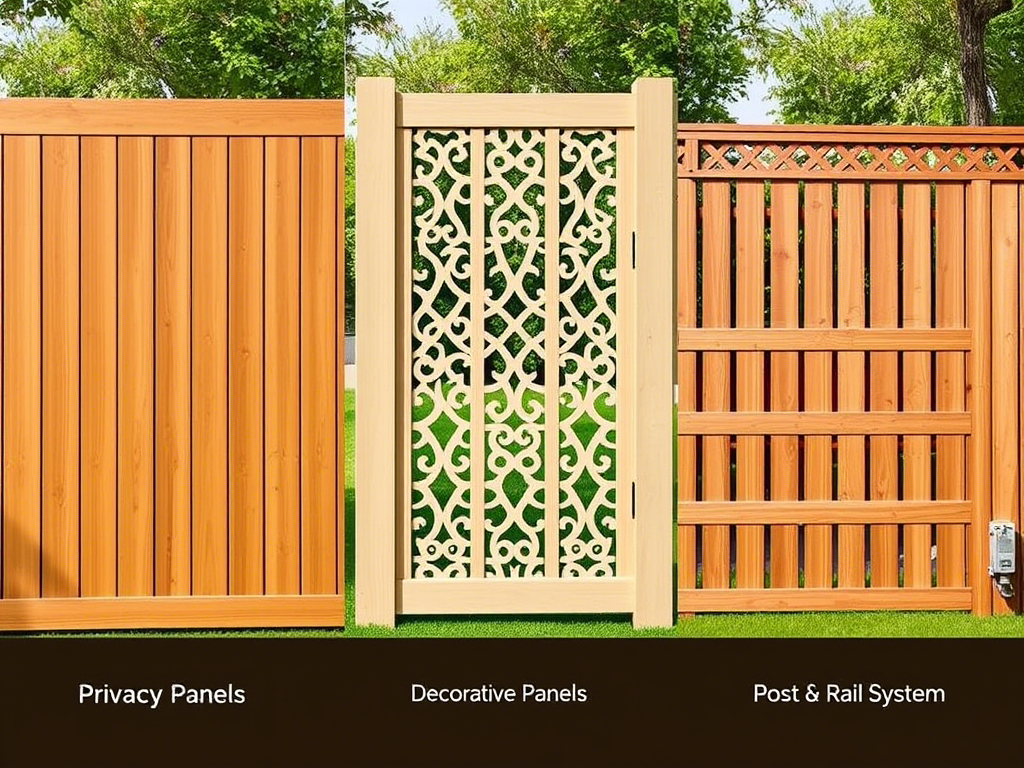
3 Popular Deck Roof Styles Compared
Roof style dictates everything from cost to curb appeal. Three configurations dominate most residential projects: an attached shed (lean‑to) roof, a freestanding flat roof, and a pergola‑style open beam structure with a solid roof. Each performs differently under rain, snow, and sun, and the choice often hinges on whether the house can carry half the roof load.
An attached roof slopes away from the house, tying into the existing roof or wall. It sheds water efficiently and feels like a natural extension of the home. Freestanding flat roofs sit entirely on their own posts, which means no ledger board connection to the house—a big plus if your home's exterior can't handle the additional load. Pergola‑style roofs use beams and rafters but can still support solid metal or polycarbonate panels; they look airy yet keep you dry.
Attached roofs cost more because they require cutting into existing roofing and extensive flashing. Freestanding designs need more posts and bigger footings but avoid house‑connection complexities. Pergola roofs with solid panels often come in pre‑engineered kits, which slashes labor time. For a 16‑by‑20‑ft deck, a pergola‑style roof can be built for under $2,500 in materials, while a full attached shed roof with asphalt shingles might run $5,000–$7,000 before labor.
Step‑by‑Step: How to Plan Your Deck Roof Project
Jumping straight to framing is the fastest way to waste materials and miss code requirements. A disciplined planning phase—before you buy a single board—saves time and prevents expensive corrections later. Here's the sequence professionals follow.
- Measure and document the existing deck. Record joist spans, beam sizes, post dimensions, and footing locations. Take photos of all connections. This becomes your baseline for the engineer.
- Choose the roof style and pitch. Attached roofs need a minimum 3:12 slope for shingles, ¼:12 for metal. Freestanding flat roofs require at least 1% slope for drainage. Mark the proposed roofline on your house with tape to visualize sightlines from inside the home.
- Select materials. Galvalume steel panels weigh about 1 lb per sq ft, while asphalt shingles with underlayment approach 3 psf. In snow zones, lighter roofs put less demand on footings. Cedar shakes weigh even more and need steeper pitches.
- Get structural drawings. A licensed engineer will provide stamped plans showing post sizes, beam spans, rafter connections, and foundation details. Budget $400–$1,200 for this step. Without stamped drawings, most building departments won't even review your permit application.
- Apply for the permit. Prepare a plot plan showing the deck footprint and roof outline, set‑back distances to property lines, and the height above grade. Many jurisdictions require the roof to stay 3–5 ft from the side property line and below the main roof peak.
Work through those five steps before you pick up a hammer. A common mistake is buying materials according to a rough sketch, only to find the inspector demands larger headers or deeper footings that render half the lumber pile unusable.
Deck Roof Cost Breakdown: What to Expect
Total project cost swings wildly—from $1,800 for a simple polycarbonate‑covered pergola to $15,000+ for a fully sheathed, shingled roof with integrated lighting and gutters. Breaking the expense into categories helps you see where savings are realistic and where they aren't.
| Cost Category | Low End | High End |
|---|---|---|
| Engineer/Architect Stamped Plans | $400 | $1,200 |
| Permits & Inspections | $150 | $500 |
| Roof Materials (panels, underlayment, fasteners) | $800 | $3,000 |
| Framing Lumber & Hardware | $600 | $2,200 |
| Footing Reinforcements (if needed) | $200 | $1,500 |
| Labor (if hiring a contractor) | $2,000 | $7,000 |
The largest single variable is labor. A skilled framing crew can raise a deck roof in three to five days, while a DIY build may stretch over several weekends—though you'll save 40–60% of the total. Footing work often surprises homeowners. In frost‑prone areas, digging and pouring new footers for four posts can eat up $1,000 in concrete, rebar, and rental equipment before a single beam is set.
Permit fees are often based on project valuation; $150–$300 is typical for a deck roof in most municipalities. Don't skip this step—unpermitted structures can stall a home sale and void homeowner's insurance.
DIY vs. Hiring a Pro: A Decision Framework
Adding a roof over your deck sits in a gray zone between ambitious DIY and definitely‑hire‑a‑pro. The decision doesn't rest on your confidence alone—local building codes may require a licensed contractor for any structural work that ties into the house. Ask yourself these seven questions, and tally the answers before committing.
- Can you read structural drawings? If beam size notations (e.g., 5‑1/8″ x 12″ GLULAM) and load tables look like a foreign language, hire a pro.
- Are you experienced with roof framing and flashing? A deck roof that connects to the house demands perfect flashing at the ledger. Water leaks from poor flashing can rot the house wall within two years.
- Do you own or can you rent fall‑protection equipment? Working at roof height requires harnesses and guardrails. A broken ankle from a 10‑ft fall isn't worth the savings.
- Does your jurisdiction allow homeowner‑built structural additions? Some cities allow DIY if you pass a homeowner's exam; others require a licensed general contractor.
- Can you dedicate 4–6 weekends without interruption? An uncovered roof framing mid‑build is vulnerable to wind and rain. Delays can damage materials and compromise unfinished connections.
- Are you comfortable setting and finishing concrete footings? Footings must be poured to exact depth and level, with embedded anchor bolts placed precisely to align with post bases.
- Is the deck elevated more than 6 ft above ground? Heights increase both the danger and the complexity of bracing temporary supports.
If you answered "no" to two or more of these, hire a professional for at least the structural portions—footings, post installation, and ledger board attachment. You can still save money by handling the roofing panels, trim, and finish work as a DIY phase.
Permits & Codes: What You Need to Know
Almost every municipality treats a deck roof as a structural addition, meaning a building permit is non‑negotiable. The inspector will verify not only the roof itself but whether the supporting deck is still code‑compliant. Here are the typical code provisions that trip up first‑time applicants:
- Setback requirements. Roof eaves must stay 3–5 ft from side property lines in most residential zones. Overhangs that project into the setback are often prohibited.
- Height limits. Accessory structures (including deck roofs) are usually capped 12–15 ft above grade. If your deck is already elevated, a peaked roof may exceed this.
- Snow load and wind speed. Your building department will provide the design ground snow load (e.g., 30 psf) and basic wind speed (e.g., 115 mph). The engineer uses these to size rafters and uplift connections.
- Lateral bracing. Freestanding roofs must resist wind forces without racking. Expect to install knee bracing or shear walls engineered for your area's wind exposure category.
- Electrical rough‑in. If you plan lights or a ceiling fan, the rough‑in wiring must be in place before the roof is sheathed, and permitted separately.
The fastest way to get rejected: showing up at the permit counter with a pencil sketch. Bring a plot plan, stamped structural drawings, material spec sheets, and photos of the existing deck. Many departments now accept digital submissions. Processing takes 2–4 weeks, so submit early.
Pro Tips for a Successful Deck Roof Installation
Even when the structure is sound, the details make the difference between a porch that's a pleasure and one that drips, leaks, or traps heat. These field‑tested tips come from contractors who fix the mistakes others make.
- Integrate drainage into the deck. Roof runoff must be caught by gutters and piped at least 4 ft away from footings. A downspout that pours onto the deck surface will eventually rot the boards underneath and attract ice dams in winter. Run leaders through the deck to splash blocks on grade.
- Ventilate the roof cavity. A closed‑in solid roof without soffit‑to‑ridge airflow will cook you in summer. Install continuous soffit vents and a ridge vent even on a small roof, and fill the rafter bays with baffles before insulating.
- Use stainless‑steel fasteners. Standard electro‑galvanized nails corrode quickly under a roof that captures moist, stagnant air. Opt for 316‑grade stainless screws and hangers, especially within 10 miles of salt water.
- Pre‑wire for upgrades. Pull 14/2 cable to a junction box in the ceiling before decking goes on, even if you don't install a fan or lights yet. Adding wiring later means cutting into finished ceilings.
- Trim overhangs to match the house. A 12‑inch eave with the same fascia profile and paint color as the home's existing trim instantly makes the addition look planned, not tacked on.
- Schedule around the seasons. Spring and fall offer ideal temperatures for concrete curing and shingle sealing. Summer asphalt work risks melting adhesive strips before they bond, and winter concrete needs insulated blankets and accelerators that drive up costs.
- Keep a 2‑inch gap between metal roof panels and any combustible framing. This is a code requirement that home inspectors love to flag. Use metal furring strips if needed.